 |
| EGlobioTraining Center Philippines SEMINAR ON ANDROID MOBILE APPS DEVELOPMENT |
Contents at a glance
1. Android history
2. Introduction
3. Setup
4. Create the first
project
5. Add UI elements
Andy Rubin led a small startup team sometime in 2003. They
were building software that could power a smart phone. Google took notice of it
and acquired Android Inc. The first attempts of Android were not very
impressive but phone manufacturers took notice and jumped into the bandwagon.
Shortly thereafter, 200,000 android devices were being
activated on a daily basis (at the time of writing, over half million android
devices are activated each day). The small-ish mobile phone software began to
make waves.
Android's snowball noticeably gained momentum sometime in 2008
- 2009---this is the time they began using sweet snack monikers on each version
of Android; it has been unstoppable since then.
2003 - Android Inc., was founded by Andy Rubin
2005 - Android Inc
was Acquired by Google
2008 - Android v1.0
2009 - Android v1.1
2009 - v1.5
(CupCake), v1.6 (Donut)
2009 - v2.0/2.1
(Eclair)
2010 - v2.2 (Froyo),
v2.3 (GingerBread)
2011 - v3.0
(HoneyComb)
2011 - v4.0 (Ice
Cream Sandwich)
2012 – v4.1, v4.2,
v4.3 (Jelly Bean)
2013 – v4.4 (Kitkat)
2014 – v5.0
(Lollipop)
An article about Andy Rubin and Android, titled AndroidInvasion appeared on a NewsWeek article sometime in 2010. Follow the link if
you want to know a bit more about Android's history.
Introduction
Android is;
1. a Linux based
Operating System for mobile devices
2. developed by OHA
(Open Handset Alliance) led by Google Inc
3. a rich
development platform for mobile applications
4. free, you can get
the SDK (software development kit) without paying anything to anybody
5. an approachable
platform. You can develop apps using various platforms (OSX, Linux, Windows)
6. getting a lot of
attention. Over 10 Billion downloads on Google Play (at the time of writing).
Over 500,000 apps have been writted (or ported). Over half a million device activation per day.
The Software Stack
 |
| Android Software Stack |
Under the hood of Android is good old Linux--it has been
chosen for many reasons, but primarily because of its stability. Android comes
with a lot of libraries (the green boxes on the diagram). You will notice it
has SQLite (for database programming), OpenGL (for graphics programming),
Webkit (the browser engine that powers Safari and Chrome to name a few) and SSL
(for security).
The Android runtime (the blue boxes) consists of (some) core
Java libraries and the Dalvik VM. The runtime is not the same JRE/JDK that you
have on your desktop. The Android runtime uses a subset of Apache Harmony.
Harmony is an open source, free Java implementation from the Apache Software
Foundation--the politics of why Android did not use the Oracle reference implementation
of the JDK will not be part of this tutorial, I am sure you can find that
somewhere else on world wild web.
Android also comes packaged with Application
Frameworks--this is the part of the Android that you will see frequently. As an
Android developer you will spend a great deal of time reading, studying,
implementing and using these frameworks.
What do you need to Get Started in Android Programming?
1. Either an OSX,
Linux or Windows machine
2. A good internet
connection (the SDK download is bit hefty)
3. A programmer's
editor (or an IDE, if you prefer)
4. Learning
resources, books on Android programming and other online resources like developer.android.com
5. A Java
development environment (either JDK 1.6, 1.7 or 1.8)
6. Apache Ant
7. A study approach.
Like anything important, an attack or approach is need to in order to grow in
the direction of skill
8. Lastly, a Java
Programming background - if you are new to Java, try to check out how much Java
do I need for Android Programming to size up the learning curve and how much
you are up against
Okay, dive in.
- Getting Started on setups
1. Download the
Android SDK from android.developer.com. Choose your platform. In my case, it
was a zipped file
2. Place the
unzipped file somewhere in your directories. It is best not to put in a
directory that contains white space. I placed mine inside
/Users/myname/prgtools/android-sdk (this is your ANDROID-HOME)
3. Go to your
ANDROID-HOME/tools, launch the android executable. This will launch the Android
SDK Manager. The android SDK needs an internet connection. It connects to the
android.developer.com website and checks which SDK levels are installed in your
machine.
Naturally, if you have installed the SDK, there won't be much. Choose
the API levels that you would like to install in your machine.
Each version or platform of Android (Froyo, Gingerbread etc)
is a numbered API level. If you want to install the Froyo SDK, for example,
then check the box next to API level 8 (Android version 2.2). If you have
really fast internet connection and you are not sure which API to check, check
them all---be warned though, you will wait for a long time for it to finish.
4. Include the
android tools and platform tools in your shell's path. You will need it if you
want to work with android using the command line. The two folders of interest
are ANDROID-HOME/tools and ANDROID-HOME/platform-tools
In OSX, you can add the following entries in th
~/.bash_profile
export ANDROID_HOME=/path/to/android-sdk
export PATH=$PATH:$ANDROID_HOME/tools:.
export PATH=$PATH:$ANDROID_HOME/platform-tools:.
In Linux, add the following lines to ~/.bashrc, if you are
using bash
export ANDROID_HOME=/path/to/android-sdk
export PATH=$PATH:$ANDROID_HOME/tools:.
export PATH=$PATH:$ANDROID_HOME/platform-tools:.
Close the terminal, then launch it again in order to reflect
the changes we made to the PATH variable.
In Windows, there are two ways to set the PATH
The first method is via the command line (cmd.exe).
SET ANDROID_HOME=c:\>path\where\you\installed\android\
SET
PATH=%PATH%;%ANDROID_HOME%\bin;%ANDROID_HOME%\platform-tools;%ANDROID_HOME%\tools;.
You will need to run those commands though, each time you
will open a new CMD.exe. Those settings are not remembered by the shell.
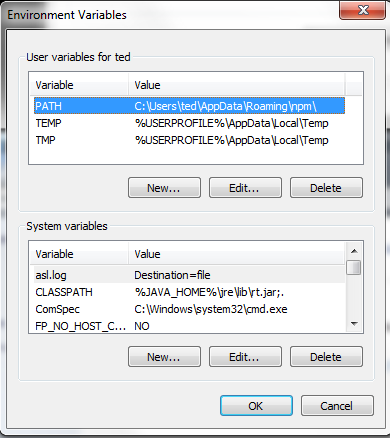
If you want to permanently set these PATHS, you need to do
it in the System Properties dialog box. First, open Control Panel, go to System
Properties, then Advanced System Settings then click the button Environment
variables
 |
| http://www.eglobiotrainingcenter.com/ |
If you have local admin rights on the machine, click the New
button on System variables section. On the variable name, type ANDROID_HOME. On
the value textbox, type the full path where you installed the Android SDK.
Close the dialog box. Next, scroll down the values on System variables, try to
find PATH, then click the Edit button. Go to the last character of the existing
entry, then add%ANDROID_HOME%;%ANDROID_HOME%-tools;%ANDROID_HOME%;.
Once you are done with the setup, try to type android from
the command line. If it launches the android SDK manager, then you have set the android paths correctly.
 |
| http://www.eglobiotrainingcenter.com/ |
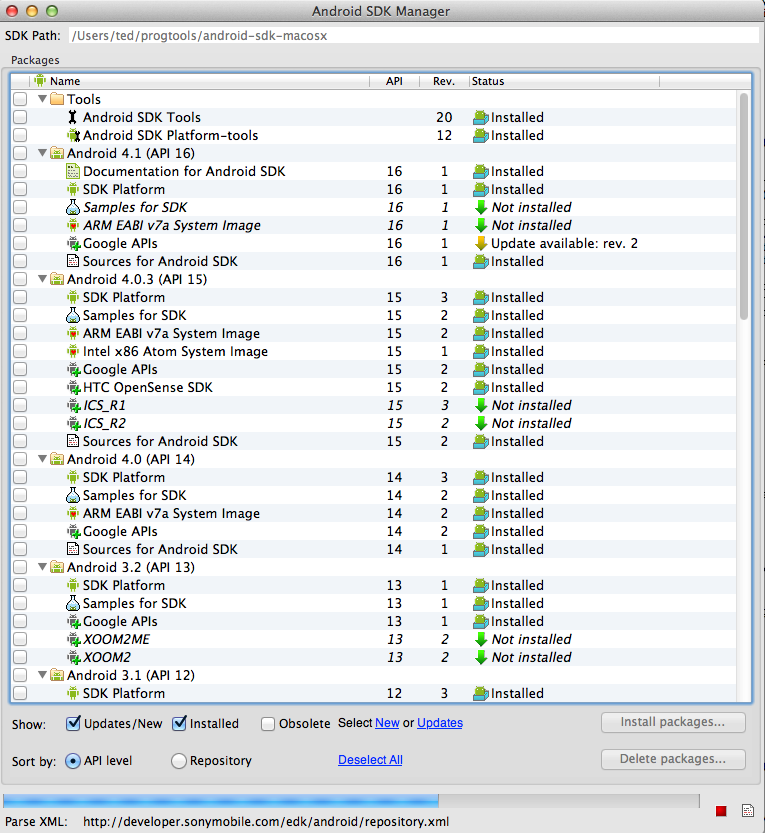
I've been using this SDK manager for quite some time now,
that is why a lot of tick boxes says "installed". During your first
run of this SDK manager, they will mostly be empty. You need to download quite
a bit before you can get down and dirty in trying to write your first few apps.
The top level folders (tick boxes) are numbers which
correspond to the Android versions. If you want to develop for Ice Cream
Sandwich, Honeycomb, Gingerbread and Froyo, you will need API levels 16, 15,
14, 12, 10 and and 8 respectively, so tick them all, start the download---and
get some coffee, it will take some time depending on the speed of your internet
connection.
- Create the first project
The Hello World application is probably the most beaten down
piece of sample code. Some developers look down on it because it is (already)
downright nauseating. This poor example though, still has merits. It is the
tiniest step one can take towards programming in unfamiliar territory and as
such, the simplest.
There is no shame in taking baby steps. Knowing (well) how
to construct and run the simplest programs goes a long way. Having said that,
let's do the Hello World app in Android.
The Hello World of JSE (Java Standard Edition) is markedly
different on the Android platform. It is not a simple case of sending a bunch
of characters to the stdout (STDIO's standard out). Android is a platform for
rich user interfaces. The Hello World in Android is way more involved than
simply creating a simple class, defining static main() and invoking the
out.println(). You will need to create and Activity object, override its
onCreate() method, invoke the ant build tool, define an AVD (Android Virtual Device)
and install the .apk (Android Package) either into the AVD or a physical
Android Device--now, I hope you have a new found respect for the Hello World
application. Let's get started.
If you have installed and configured the Android SDK, you
should be ready to dive into code. If you haven't, go back to the section
above, item 1 of Part 1 (Getting Started on setups). The Android SDK comes
equipped with scripts that will assist in creating, debugging, deploying and
testing our projects.
1. Choose a working
directory for your project. Open a terminal (Terminal.app on OSX, cmd on
Windows and xterm, gnome-terminal etc on Linux).
2. You might want to
put this project under source control. This is completely optional at this
point, but I encourage you to start getting into the habit of putting your dev
works under source control, it will save you a lot of heartaches in the future.
You can still proceed with the tutorial even if you don't have source control
though.
3. Use the android
create project command to setup the project. On the terminal, type
android create project --target 8 path helloworld --activity
Hello --package com.thelogbox
The android create project command is available if you have
properly setup your PATH variables. If you get an error such as "Bad
command or filename" or "command not found" or something to that
effect, that is your just OS telling you that the android executable is not
properly setup. Go back to Getting started on setups.
There's quite a bit going on in here, so let's slow down and
take look what those flags mean.
--target expects an integer value. This value stands for a
unique API level for a specific android version. In our example above, level 8
was specified because I intend to target android 2.2 (Froyo). Gingerbread will
have a different value, Honeycomb will have a different one as well. If you
want to see all the possible targets, you can type android list targets
--path specifies the name of top level folder for your
project. Think of it as a project folder. It will be the root directory of your
project
--activitity will cause our project to create a class that
extends from the the Activity class. An Activity is commonly used if we need a
user-facing class. Think of it as UI 2 mechanism in android. In our example,
--activity Hello means that our project will have class named Hello and is a
child class of the base class Activity
--package an android project will be comprised of various
XML files, resource files and Java source files. The Java source files will be
stored using the package directive that we specify in the option. The package
directive will only affect the location of Java source files, it will not
affect the location and storage of the other android resources (i.e. XML files)
If the command completed successfully, you are supposed to
have a directory similar to this one
What the android create project generated
├── AndroidManifest.xml
├── ant.properties
├── bin
├── build.xml
├── libs
├── local.properties
├── proguard-project.txt
├── project.properties
├── res
│ ├── layout
│ │ └── main.xml
│ └── values
│ └── strings.xml
└── src
└── com
└── eglobiotraining
└── Hello.java
It's quite a mouthful and probably enough to stop a
beginning programmer to his tracks and pack up, but don't do that. We will
explore each and everyone of those files and folders. You can safely ignore
them for now. We are just trying to get a feel of how to create a
project---remember?
For now, just play around the project. Open the generated
files--don't worry, they are all text files--see what they look like. They
might fly over your head at this point, that's okay.
The android create project script actually generated a Java
class source file for us, the Hello.java. This is an Activity class, for now
just think of an Activity as some sort of window---it is more than that
actually, but for now just think of it like a window so we don't have to deal
with the complications. You would normally use an Activity class if you want
"the user to do something". In this case, we want him to see a simple
"Hello World" message.
You don't have to change the codes at this point. The
"Hello World" is actually written for you when we created the
project. If you are curious, the Hello message is inside main.xml file--we will
explain that in a little while.
There are a lot of files generated by create project script
becauase Android apps needs quite a bit of infrastructure code, unlike simple
JSE (Java Standard Edition) programs. This is one reason why thecreate script
includes a build file (build.xml), so that we dont' have muck around whipping
up our own compilation scripts.
The build.xml contains instructions on how to compile and
deploy your app source code into a working .apk.
1. If you haven't
closed the terminal yet, go to it. If you have closed it, open the terminal
again and navigate to the root folder of the android project.
2. Try typing ant on
the terminal. It should echo a bunch of possible targets. We will use the debug
target to build our android app.
We will use the debug target so that we can side step
android's requirement to setup security keys and signing our applications with
that key. Let's deal with the application signing later on when we get to
deploying and releasing our mobile app in the wild.
If we use the debug target, ant will generate a debug key
that will serve as the security key for our app. This is good enough for now
because we are just fooling around. Compile the app by typing
$ ant debug
You should see a bunch of scrolling echo messages in the
terminal. Look for a message (right towards the end) that says something like
BUILD SUCCESSFUL. It should be successful for now because we haven't messed
around with it yet. There is no reason at this point for the build to fail.
.
├── AndroidManifest.xml
├── ant.properties
├── bin
│ ├── AndroidManifest.xml
│ ├── AndroidManifest.xml.d
│ ├── Hello-debug-unaligned.apk
│ ├── Hello-debug-unaligned.apk.d
│ ├── Hello-debug.apk
│ ├── Hello.ap_
│ ├── Hello.ap_.d
│ ├── build.prop
│ ├── classes
│ │ └── com
│ │ └── eglobiotraining
│ │ ├── BuildConfig.class
│ │ ├── Hello.class
│ │ ├── R$attr.class
│ │ ├── R$layout.class
│ │ ├── R$string.class
│ │ └── R.class
│ ├── classes.dex
│ ├── classes.dex.d
│ ├── jarlist.cache
│ ├── proguard.txt
│ └── res
├── build.xml
├── gen
│ ├── R.java.d
│ └── com
│ └── eglobiotraining
│ ├── BuildConfig.java
│ └── R.java
├── libs
├── local.properties
├── proguard-project.txt
├── project.properties
├── res
│ ├── layout
│ │ └── main.xml
│ └── values
│ └── strings.xml
└── src
└── com
└── eglobiotraining
└── Hello.java
15 directories, 30 files
Right after the compilation process, there are lots of
changes within our project directory. Quite noticeably, there are now lots of
files inside the bin and gen folders. Somewhere in these jungle lies the
executables that we can actually deploy to a real device---but save that for
later. Right now, the goal is to just be comfortable with the compilation
process. In case you encounter a "Cannot find build.xml" error, take
a look at your SDK setup. This is usually a config error on the local.propertiesfile.
Look here for details of the error.
Testing the app. At this point, what we have done is simply
compile an .apk, we haven't deployed it yet, either to a physical device or to
an AVD. To see and appreciate your app in action, you need to deploy it either
to an AVD (Android Virtual Device) or a physical device.
The AVD is an emulator. You need to create and configure an
AVD using the android SDK manager;
1. On a command line
terminal, type android
2. Wait for the SDK
manager window to appear, then go Tools then AVD
3. Click New to
create an AVD.The next screen will ask you a bunch of questions on the
technical details of the AVD that want to create. Fill it up with what is
applicable to you (screen resolutions, amount of RAM to dedicate etc)
4. Launch the AVD when you are done
NOTE: The AVD is terribly slow. If you are serious in
developing android apps, I urge you to invest (even) on a cheap physical
android device because the wait time on deployment using an AVD is counter
productive and a gross misuse of developer (your) time.
If you will use a physical device for testing, you need to
just a few things.
1. Before you
connect the device via a USB, you need to check some settings on the device.
2. Go to Settings,
then Applications then Development. You need to enable USB debugging.
 |
| http://www.eglobiotrainingcenter.com/ |
- Now you can
connect the device to the development machine
Deploying the app. To deploy the app, either you invoke ant
debug install or adb install bin/Hello-debug.apk. Either one of these commands
needs to be typed from the root of the android project folder.
 |
| http://www.eglobiotrainingcenter.com/ |
- Add some UI element to the project
The project we created in Android is a very specific one, it
is an Activity project (we did pass the --activity directive when we first
created the project). As such, it included a default class that extended
Activity. You can think of Activities as some sort of UI projects, they are
intended to communicate to the user via GUI interfaces.
Think of Activity classes as some sort of a Window or a
Frame in, like in javax.swing, but they are coded an manipulated a little
differently. In Swing programming, the individual widgets (buttons, textfields
etc) are declared and added to the Frame programmatically. The widgets are
instantiated, usually within the same source file where a JFrame has been
extended, then they are added to a Container---usually the JFrame. When using
Activities, you will need to work with an XML file in order to define the
widgets and their layouts. You will also need to work with a Java source file
(the class that extended the Activity) in order to respond to events.
Go to your project folder, to the src directory and drill
down to the java source file, you will see the default source code that the
Android create project command generated for us.
package com.eglobiotraining;
import android.app.Activity;
import android.os.Bundle;
import android.widget.Toast;
import android.content.Context;
import android.view.View;
public class HelloWorld extends Activity
{
/** Called when the activity is first created. */
@Override
public void onCreate(Bundle savedInstanceState)
{
super.onCreate(savedInstanceState);
setContentView(R.layout.main);
}
}
It is a basic Java class that extended the
android.app.Activity class. Take a look at the last statement inside the
onCreate() method. That last statement is an directive on where and how to the
get the instructions for building the user interface.
The setContentView() is an overloaded method of Activity, it
can take various parameter(s) and type. In our example, what was passed as
param was R.layout.main—it is an integer constant. The R class was
auto-generated by Android—specifically, it was generated by the appt, short for
android asset packaging tool. If you want to take a look at the source, it will
be in folder gen/your-package-name/R.java. That is not important right now
though, what is important to know is that the Activity class provides for a
method (setContentView) where we can point to an XML resource, this XML
resource is where we will draw our user interface.
R.layout.main maps to main.xml which can be found on the
folder res/layout/main.xml Here is what Android generated for us.
<?xml version="1.0" encoding="utf-8"?>
<LinearLayout xmlns:android="http://schemas.android.com/apk/res/android"
android:orientation="vertical"
android:layout_width="fill_parent"
android:layout_height="fill_parent"
>
<TextView
android:layout_width="fill_parent"
android:layout_height="wrap_content"
android:text="Hello World"
/>
</LinearLayout>
The main node is LinearLayout, this is not always the case,
there are a couple of layouts to choose from in Android--we will circle back to
this later, but for now, let's use the LinearLayout. You can think of the
LinearLayout as the equivalent of java.awt.FlowLayout in JSE programming. It
organizes the widgets by stacking them together linearly, from left to right,
then top to bottom. Inside the main LinearLayout node is a another XML tag, the
TextView tag. TextView is the equivalent of java.awt.Label or
javax.swing.JLabel, it is a static text widget, you won't be able to edit them,
they are good for, well, labels. The order of how the views are defined in the
XML affects the order of how the views are displayed. This is the simplest
layout, that is why I chose this as a starting point.
We will add another view to our screen, an editable text
component. Go back to the editor and insert another view inside the
LinearLayout main node.
<?xml version="1.0" encoding="utf-8"?>
<LinearLayout xmlns:android="http://schemas.android.com/apk/res/android"
android:orientation="vertical"
android:layout_width="fill_parent"
android:layout_height="fill_parent"
>
<TextView
android:layout_width="fill_parent"
android:layout_height="wrap_content"
android:text="Hello World"
/>
<EditText
android:layout_width="fill_parent"
android:layout_height="wrap_content"
/>
</LinearLayout>
EditText is an editable text component, very similar to
javax.swing.JTextField. The android platform knows how to handle the EditText.
Once this view has focus, the on-screen keyboard will pop so that the user can
begin input. You do not need to handle the popping of the keyboard, it will be
done for you automatically.
Save the project, then compile and run.
$ ant clean
$ ant debug install
This is what the app will look like on the device.
 |
| http://www.eglobiotrainingcenter.com/ |
The layout seems okay but it's a little weird because labels are usually laid out to the left of a text field, not on top. The reason for this is because our LinearLayout's orientation is "vertical" which causes the components to flow from top to bottom. We can change this behavior so that components inside the layout will flow from left to right.
The reason for this is because LinearLayout as it is defined right now is oriented vertically. That is easy to remedy, just change the orientation of the layout to "horizontal",
<?xml version="1.0" encoding="utf-8"?>
<LinearLayout xmlns:android="http://schemas.android.com/apk/res/android"
android:orientation="horizontal"
android:layout_width="fill_parent"
android:layout_height="fill_parent"
>
<TextView
android:layout_width="wrap_content"
android:layout_height="wrap_content"
android:text="Hello World"
/>
<EditText
android:layout_width="fill_parent"
android:layout_height="wrap_content"
/>
</LinearLayout>
Save the project, compile, then run. Notice any difference?
 |
| http://www.eglobiotrainingcenter.com/ |
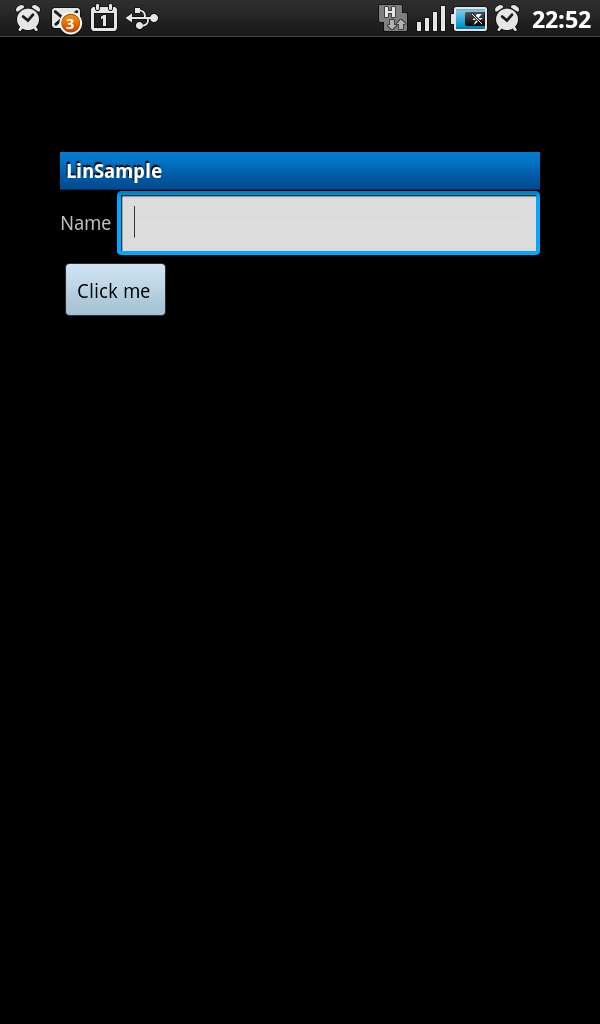
The Name TextView is now immediately to the left of the EditText, as compared to our first version of our layout where the Name TextView was on top of the editable text.
There were two changes that made the second layout possible.
1. Change the android:orientation of LinearLayout from "vertical" to "horizontal", this caused TextView and the EditableText views to flow from left to right, rather than top to bottom.
2. Change android:layout_width of the TextView from "fill_parent" to "wrap_content". Had we not made that change, the EditableText view would not have been visible. "Fill_parent" causes the view to occupy whatever space is remaining to right of the component. "Wrap_content" on the other hand, simply uses whatever space the component needs to display itself and allows the next component to occupy the next slot.
- Add a button to the screen
The last component we will add to the screen is a Button.
<?xml version="1.0" encoding="utf-8"?>
<LinearLayout xmlns:android="http://schemas.android.com/apk/res/android"
android:orientation="vertical"
android:layout_width="fill_parent"
android:layout_height="fill_parent"
>
<TextView
android:layout_width="fill_parent"
android:layout_height="wrap_content"
android:text="Hello World"
/>
<EditText
android:layout_width="fill_parent"
android:layout_height="wrap_content"
/>
<Button
android:layout_width="wrap_content"
android:layout_height="wrap_content"
android:text="Click me "
/>
</LinearLayout>
As usual, compile and run---you will do the edit-compile-run routine lots of times, you need to get used to this. Every time you make a change on your code or any of the assets of the android project, you need to compile and run.
 |
| http://www.eglobiotrainingcenter.com/ |
It is not a pretty sight. The reason for this result are the following;
1. The Button, TextView and EditText views are inside a single Layout container, which will arrange each view to flow from left to right.
2. The EditText's layout_width is set to wrap_content, which means in case there is a component right after it, it will generously give the space to the next view.
We will make some changes to main.xml so that:
1. The Button view does not share the layout container with the TextView and the EditText views. We will place it outside the innder LinearLayout container.
2. Since the Button view will not share the layout container with the other views, the EditText will be the last component defined in the inner LinearLayout---we should change its layout_width to "fill_parent", so it occupies whatever space is left to its right.
<?xml version="1.0" encoding="utf-8"?>
<LinearLayout xmlns:android="http://schemas.android.com/apk/res/android"
android:orientation="vertical"
android:layout_width="fill_parent"
android:layout_height="fill_parent"
>
<LinearLayout
android:orientation="horizontal"
android:layout_width="fill_parent"
android:layout_height="wrap_content"
>
<TextView
android:layout_width="wrap_content"
android:layout_height="wrap_content"
android:text="Name "
/>
<EditText
android:layout_width="fill_parent"
android:layout_height="wrap_content"
android:id="@+id/name"
/>
</LinearLayout>
<Button
android:layout_width="wrap_content"
android:layout_height="wrap_content"
android:text="Click me "
/>
</LinearLayout>
The adjusted layout looks like this
 |
| Android Training Manila Philippines |